Guest database
The guest database contains absolutely all entries about guests taken from bookings, which have come to you from booking sites, booking engines, or ones that you have manually created in Previo. Each entered guest has a database entry, which contains all of the data that you have entered into his/her guest card during the booking (name, address, date of birth, nationality, document number, license plate number, email, phone number, or other tags and comments assigned to this guest).

The guest database allows you to filter and search for guests either through a (1) full-text search (according to organisation, name, phone number, etc.), as well as other search categories, e.g. guest category, total number of bookings, or tags. All filter options can be combined in the left panel.
The flash icon (2) has several quick filters to facilitate database use. Filter guests with or without bookings, currently accommodated guests, and all guests with an entered email.
Add a new guest to the database by using the next icon (3). Creating a new guest is exactly the same as adding the guest through a guest card in a booking. Complete all available information supplied to you by the client. Once saved, this guest will be offered in the autocomplete menu when adding a guest to a booking based on the first few letters of his/her name (email, etc.). After selecting this guest from autocomplete, the guest card is automatically filled out with all the previously entered data.
The following two icons (4) relate to maintaining the database and individual entries. If you select several entries (e.g. guest duplicates), you can merge these entries into one by clicking on the first button with arrows. Please see article 7 – Guest Management regarding details on merging duplicates. The second icon with the red cross deletes selected guests. You can also delete entries by using the same icon on the far right in the line of the given guest in a filtered selection.
The printer icon (5) will export your filtered selection into a CSV file format. Once modified, this file can be used, for example, when sending out mailing campaigns through an app like MailChimp. If you use Previo’s Mailing module, you will not even need this exported file. All the recipients of the mailout are generated directly from the database without the need to export data into separate files.
The pencil icon (6) by each individual guest’s entry allows you to access the card of the given guest (basically the same window as in the case of filling out this card directly in the booking). You are able to edit data only in the first tab, which shows all the available information of the client. The second tab of this window has a log of the client’s complete booking history.
Settings (7)
Notifications for guests birthday can be also set here (7) you can manage two different things. In first tab you can choose from multiple options** when you want to be notified about the birthdays of your guests** + you are ale to preselect default country and nationality of newly created guests.
By default its set to hotels country. In case you have a majority of guests coming from one particular country you can change it. We recommend also to set only the address country and to leave the other fields blank. Also you can leave the address country field empty.
In the second tab you have guest labels management. You can create a new ones or delete the old ones.
Guest management (8)
You can administer the entire database through Guest Management (8). This tool informs you about “mistakes” in the database, e.g. duplicates, etc. – please see the print screen below:
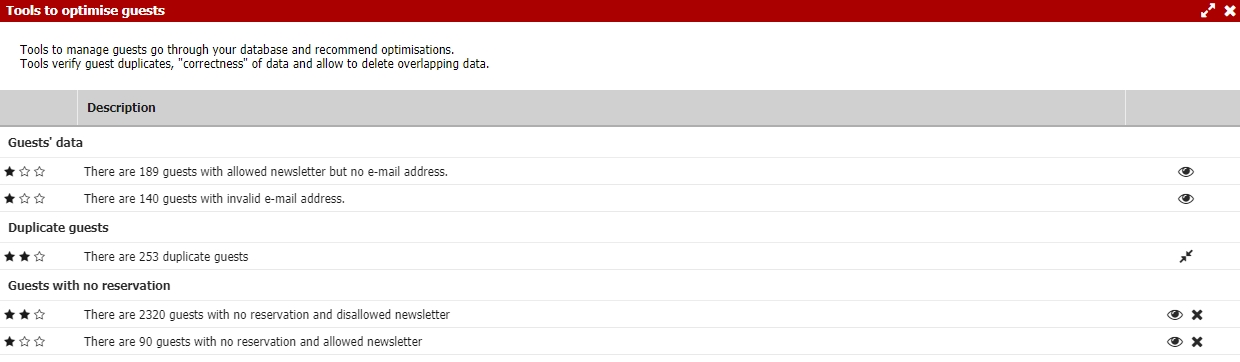
This tool merges duplicates by showing you all the duplicate entries of one guest in one window. The merging tool looks like this:
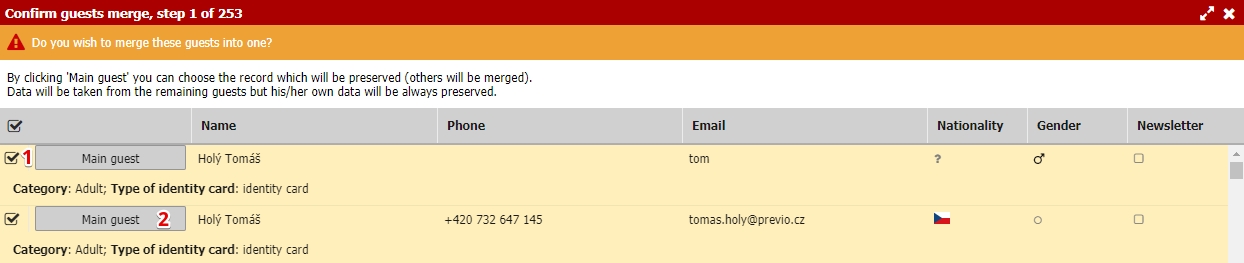
The window gradually shows all the duplicate entries; you always select which guests you would like to merge with the help of this tool (1) For example, the selection may show a different Petr Novák from a different city, who I do not wish to merge with the other entries, i.e. I do not want to remove him from the database.
After selecting the guests to be merged, the Main Guest (2) must be selected. This person has the largest amount of completed information and his/her entry will act as the main entry for the merger of the other entries. All that is left to do is to confirm the merger in the lower section of the window and continue to the next duplicate.